Launch EC2 instances in Amazon Web Services
Introduction
This guide explains how to create an EC2 instance in preparation for installing Cerb.
It used to take a lot of work to build and run your own servers – especially with a requirement for high availability. With services like Amazon Elastic Compute Cloud (EC2), you can now instantly provision computing capacity and scale it up or down to meet your current needs.
While you can use an EC2 instance to replace a dedicated server or a virtual machine, we highly recommend adopting a cloud computing mindset. This means treating your EC2 instances as disposable – losing an EC2 instance shouldn't take your site offline. You should run at least two EC2 instances in different availability zones with an auto-scaling group and put them behind a load balancer. You can use Amazon's Elastic Filesystem (EFS) service to share a distributed filesystem between instances, and the Relational Database Service (RDS) to share the database.
If you require high availability and you're not familiar with cloud computing, we strongly recommend using Cerb Cloud where we handle everything for you.
Create an EC2 instance
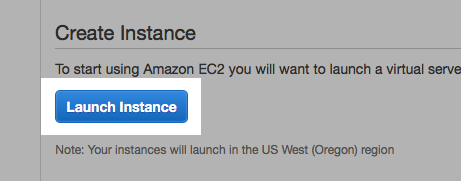
Sign in to the AWS Console. If you don't have an Amazon Web Services account you can create one from that page.
In the Services menu, select EC2.
Click on the blue Launch Instance button.
Choose AMI
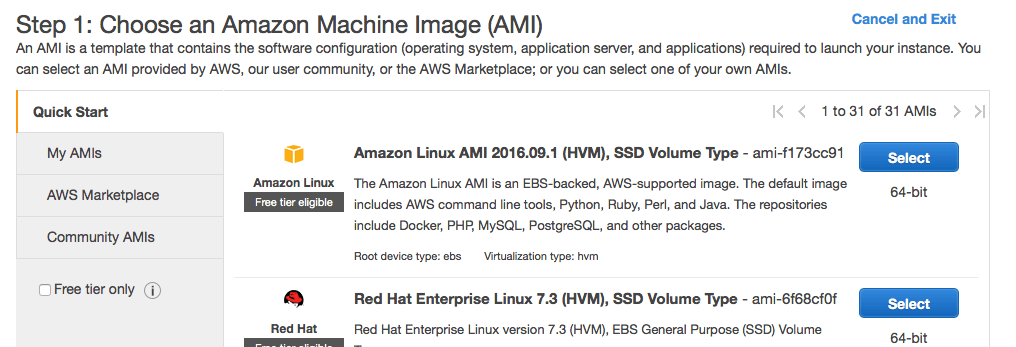
The Amazon Machine Image (AMI) determines which operating system your server will run.
We recommend:
- Ubuntu Pro 22.04 LTS - ami-0414e8df8003ade58
Click the blue Select button to the right of your desired AMI.
Choose Instance Type
Amazon offers an overwhelming array of instance types with different combinations of CPU, memory, storage, and network connectivity.
For Cerb, the proper instance type depends on many factors:
- How many workers use Cerb at the same time
- How large your database is
- If you'll utilize other services, like RDS for the database and EFS for storage
In Cerb Cloud we currently use t3.medium instances for our web servers, since we also use auto-scaling, elastic load balancing, Relational Database Service (RDS), and Elastic Filesystem (EFS). We scale by adding more instances rather than increasing the resources on a single instance.
Generally, m4.large or t3.medium will suit most purposes. You can always scale up your instance type later, so this isn't a decision you're stuck with.
Click the gray Next: Configure Instance Details button in the bottom right.
Instance Details
If you aren't familiar with EC2, this will likely be the most complicated screen.
These are the most important sections:
-
Network: You should launch your EC2 instances into a Virtual Private Cloud (VPC) network. If you don't have one you can create one.
-
Subnet: Add the instance to one of your public subnets.
-
Auto-assign Public IP: If you plan to connect directly to your instance then you can assign a public IP. If your instance will be behind an Elastic Load Balancer (ELB) then you could use private IPs. However, a public IP is required to make outgoing HTTP requests from the instance unless you configure a NAT Gateway. For simplicity, you should just enable a public IP.
-
IAM role: Once you start scaling in AWS, Roles are very important for automatically granting permissions to instances without having to store credentials on each server. Since early 2017 you can now add roles to a running instance, so you can skip this step now.
-
Shutdown behavior: You should leave this set to Stop if you aren't using auto-scaling.
-
Enable termination protection: Check this box to as a precaution against accidentally terminating your instance and losing your data.
The defaults are fine on everything else.
Click the gray Next: Add Storage button in the bottom right.
Storage
The amount of storage you need depends on if this instance is just a web server, or if you'll also be running a MySQL database and storing attachments.
We highly recommend using RDS to host your database.
Provision at least 20GB in Size, but in most regions 100GB will only cost $10-12/month and it'll increase your volume's performance (IOPS).
In most cases, a Volume Type of General Purpose SSD is sufficient. If ignore the advice of using RDS and you need to run MySQL on this same instance, you should consider adding at least one dedicated volume with Provisioned IOPS SSD. You can also stripe multiple volumes with a software RAID to improve performance (seriously, just use RDS).
If you aren't using auto-scaling, uncheck the Delete on Termination box.
Click the gray Next: Add Tags in the bottom right.
Add Tags
This is a simple step. Just add a Name tag to your instance, like cerb or cerb-php-nginx.
Click the gray Next: Configure Security Group button in the bottom right.
Configure Security Group
If you don't already have security groups, we recommend creating at least two:
-
Public Web Server should allow access from anywhere to HTTP (:80) and HTTPS (:443).
-
SSH should allow SSH (:22) access from your own IP (or your office router).
Add those security groups to the instance.
Click the blue Review and Launch button in the bottom right.
Review
Review your instance settings and then click the blue Launch button in the bottom right.
Finally, you'll be asked to choose or create a key pair. Keep your private key in a secure place, as you'll need it to connect to the instance through SSH.
Select a key pair and then click the blue Launch Instances button in the bottom right of the popup.
Connect to the EC2 instance with SSH
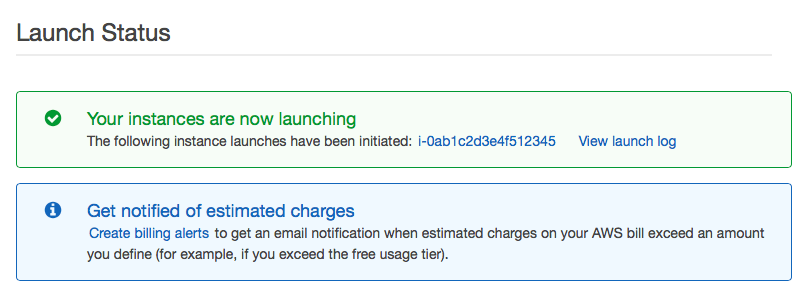
Click on your new instance ID in the green notification.
Copy the IPv4 Public IP from the properties in the bottom half of the screen. You can also find this in the table columns if you scroll right. You may need to refresh the table a few times until the IP is available.
When connecting with an SSH client, each AMI may have a different default user.
For common AMIs, the default users are:
- Amazon Linux:
ec2-user - Ubuntu:
ubuntu
If this is the first time you're using your private key, you may need to add it to your keychain:
ssh-add /path/to/private.keyThen you can connect to the server:
ssh ubuntu@1.2.3.4If you're on Windows, you can use PuTTYgen to import a private key.
Guides
These guides cover the installation of Cerb and its dependencies: