Configure project boards
- Introduction
- Enable the project boards plugin
- Create a project board
- Create a bot behavior for automatically closing tasks
- Add visual cues with custom templates
- Conclusion
- Resources

Introduction
Cerb 8.0 (June 2017) introduced project boards as a better way to visualize and organize multi-step workflows.

Project boards are based on the kanban1 development process, which itself was derived from improvements to just-in-time production pioneered by Japanese manufacturer Toyota in the 1940s2.
With kanban, each project has a board, and each unit of work in that project is represented by a card. Cards are organized into columns on the board based on their stage of completion. Typically, cards move from left to right through the columns of the process.
One of the core principles of kanban is limiting the amount of work in progress. For instance, while there may be a large number of cards in a leftmost column named "TODO", there is an agreed upon limit of 2-3 cards in the next "In Progress" column. Cerb does not enforce these limits for you, but a useful convention is adding the limit to the end of the column name – like "In Progress (3)".
One of the most compelling advantages of the kanban process is its simplicity. It can be implemented with a physical white board that has been divided into columns, with a stack of index cards (or Post-it® notes) for the tasks.
However, Cerb's digital implementation of kanban provides several enhancements:
- The project boards are visible to the entire team from anywhere.
- An activity log provides a full history of changes to the project and its cards.
- Bot behaviors can be triggered every time a card is moved into a new column. These behaviors can automate field changes, comments, notifications, webhooks, or anything else.
- Scriptable templates can change the display of cards based on dynamic factors like record type, field values, custom fields, and the current column. Cards always show the most recent information available.
In this guide, we'll build a project board for organizing our current tasks. We'll explore how bot behaviors and scriptable templates can make us more productive.
Enable the project boards plugin
First, let's make sure the Project Boards plugin is enabled:
Navigate to: Setup » Configure » Plugins » Installed Plugins
Search for: project boards
If the plugin is enabled:
You're all set!
If the plugin is disabled:
-
Click the Configure button.
-
Set the Status to Enabled.
-
Click the Save Changes button.
If the plugin isn't installed:
-
Switch to the Plugin Library tab.
-
Search for
project boards. -
Click the Download and install button.
-
Click the Download and install button on the popup.
-
Set the Status to Enabled.
-
Click the Save Changes button.
Create a project board
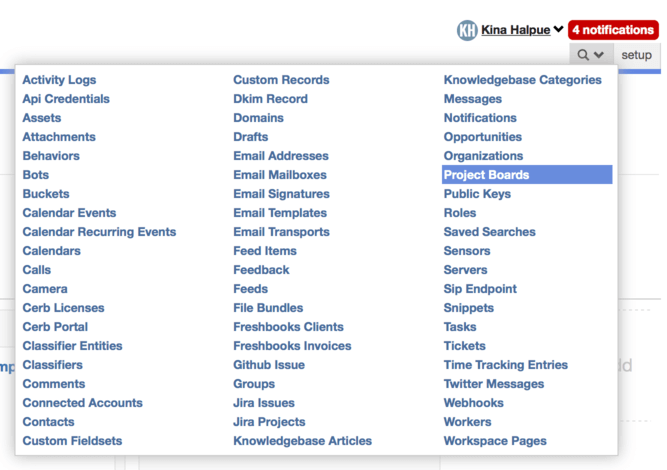
Navigate to Search » Project Boards.
Click the (+) icon above the worklist.
Set the Name to My assignments.
In Allow these record types in the project select Task.
We only want to add open or waiting tasks to the project. Within tasks, set Quick search query for adding cards to:
status:[o,w]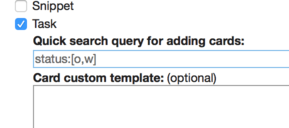
Click the Save Changes button.
Add columns to the board
Open the profile for the new project board. As a shortcut, you can open its card from the yellow notification above the worklist, and then click on the Profile button.
Use the (+) Add button in the first column's placeholder to add three new columns:
- TODO
- In Progress
- Completed!

You only need to type the Name for each column and then click Save Changes.
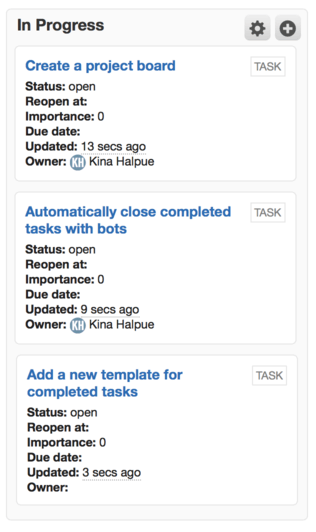
Add cards to the board
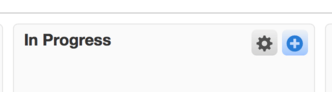
Let's add some cards to the board. Click on the (+) icon at the top of the In Progress column.
First, add a task for creating the project board:
-
Click (+) at the top of the worklist to create a new task.
-
Enter the following details:
- Name:
Create a project board - Status: open
- Owner: (click the me button)
- Name:
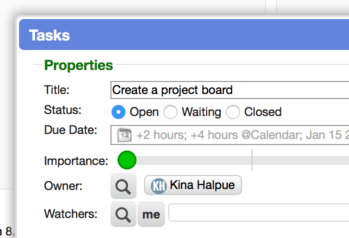
*Click the Save Changes button on the card.
Repeat the steps above to add a few other cards with a different name:
Automatically close completed tasks with botsAdd a new template for completed tasks
Now let's add the new cards to our board by clicking the Save Changes button on the chooser.
We now have a project board with three in progress tasks.
Drag your first card
We've already created a project board, so let's drag the Create a project board card to the right and drop it in the Completed! column.
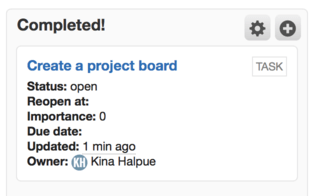
You'll notice that by default nothing special happens. The status on the task doesn't change, and it looks the same as the other cards. This is because there's nothing special about the Completed! column – it's just a label. Our underlying task is the same.
Any kind of record can be put on a project board, and we don't want to make assumptions about your workflow.
Let's close this first task by hand to demonstrate how tedious it would be:
-
Click on the blue Create a project board title on the card.
-
Click the Edit button.
-
Set the Status to Closed.
-
Click the Save Changes button.
-
Close the card popup.
Imagine having to do that for every completed task.
Fortunately, you don't have to. We can use bot behaviors to do that work for us.
This is where project boards get really interesting.
Create a bot behavior for automatically closing tasks
One of the most useful features of project boards in Cerb is the ability to run bot behaviors on cards as they are dropped into a new column. This automates almost any kind of workflow you might need.
For instance:
- Tasks can be automatically completed when dropped into the final column.
- An email can be dispatched to a worker or team when a card enters their step of the process.
- Automated tests can run on an issue when it moves into a Quality Assurance column.
- A shipping label can be automatically printed when orders enter a Fulfillment column.
- …and countless other workflows.
Let's create a bot behavior that changes the status of task cards to completed when they enter the Completed! column. This will save us a lot of time compared to doing it by hand.
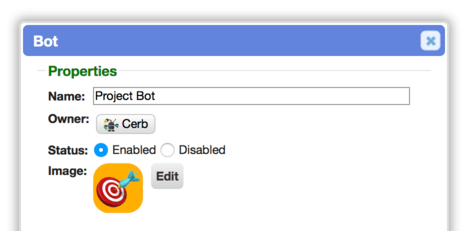
We'll need a bot:
- Navigate to Search » Bots.
- Click the (+) icon above the worklist to add a new bot.
- Enter the following details:
- Name:
Project Bot - Owner: If you're an administrator, select Cerb to create a bot that everyone can share. Otherwise, select Me to create a private bot.
- Image: Use an emoji like 🎯. If you aren't feeling creative today, use an orange (
#feaf03) background.
- Name:
- Click the Save Changes button.
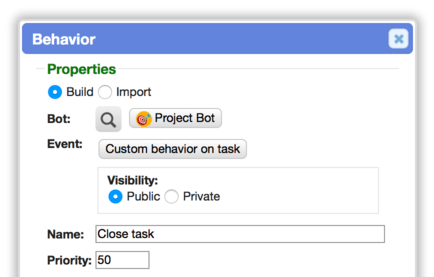
Then we need a new behavior on the bot:
- Open the bot's card by clicking on Project Bot in the yellow notification above the worklist.
- Click the Behaviors button on the bot's card.
- Click the (+) icon above the worklist to add a new behavior.
- Enter the following details:
- Event: Custom » Behavior On » Task
- Name: Close task
- Click the Save Changes button.
Now let's make the behavior do something:
- Open the card for the Create task behavior. You can click on its name in the yellow notification above the behaviors worklist.
- Click on Custom behavior on task at the bottom of the card.
- Select Add Actions from the menu.
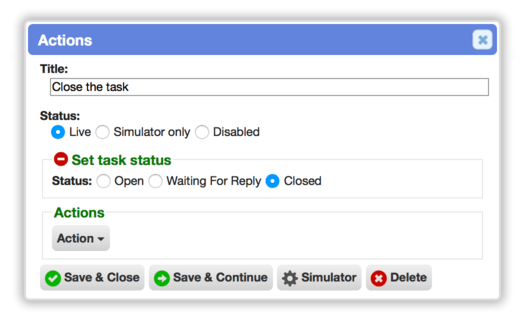
- Set the Title to
Close the task. - Click the Action button and select Set » Task » Status from the menu.
- In the new Set task status action, select the Closed status.
- Click the Save Changes button.
That's all for the behavior. You can close all of the popups by clicking on them and pressing the <ESC> key.
Add the behavior to the project board
We want our new behavior to run every time we drop a card in the Completed! column:
- Click the gear button (⚙️) at the top of the Completed! column.
- Click the Edit button.
- Click the (+) Behaviors button.
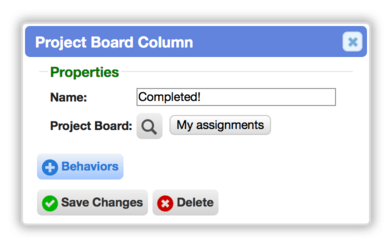
- Sort the behaviors worklist by the Updated column in descending order (most recent first) and select the Close task behavior we just created.
- Click the Save Changes button.
- Click the Save Changes button on the project column card to finalize it.
- Close the project column card.
Test the new automation behavior
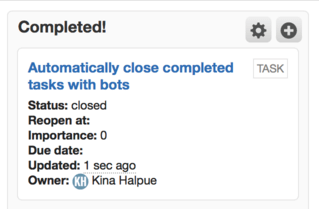
Drag the Automatically close completed tasks with bots card to the right and drop it in the Completed! column.
Now you'll notice that the Status of that card automatically changes to closed for us.
Add visual cues with custom templates
By default, when cards are added to your project board, Cerb displays the most common fields based on their record type.
However, you also have complete control to change how each card is displayed.
To demonstrate this, let's make the cards for closed tasks more obvious. We don't need to see all those fields once something is completed.
Click the gear button (⚙️) at the top of the project board's profile page.
Scroll down to Task and click into the Card custom template text box.
Paste the following template:
{% if is_completed %}

<div style="font-size:120%;">
	<span class="glyphicons glyphicons-circle-ok" style="color:rgb(0,150,0);"></span> Completed!
</div>

{% endif %}
Click the Save Changes button to close the template editor popup.
Click the Save Changes button to close the project board editor.
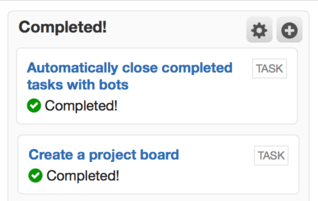
The project board will automatically refresh. The cards in the completed column now show a green checkmark with the word Completed!.
You may have noticed that we didn't provide an alternate template for cards that aren't completed. If our custom template is blank, Cerb uses its own default template.
Conclusion
Now you can drag the Add a new template for completed tasks card to the right and drop it in the Completed! column.
The bot behavior automatically closes the task, and the project board changes the card to the simple checkmark custom template.
You can use the project board concepts you just learned to better organize and automate any kind of multi-step workflow.
Resources
-
Wikipedia: Kanban (development) - https://en.wikipedia.org/wiki/Kanban_(development) ↩
-
Wikipedia: Kanban - https://en.wikipedia.org/wiki/Kanban ↩