Create custom records

- Introduction
- Example use case: Academia
- Create the instructor record type
- Create the room record type
- Create the course record type
- Add new fields to the course record type
- Create new instructor records
- Create new room records
- Create course records
- Set the default card fields for courses
- Deep search course records
- Next steps
Introduction
The boring foundation of everything: Record keeping
As Cerb has incorporated modern innovations over the past 15 years – like interactive bots and encryption – it's easy to forget that the fundamental idea of record keeping has been around for more than 5,000 years1. There's no excuse to not get that part right.
A record is simply a distinctly identifiable entity that you can refer back to. When records refer to the same kind of entity, we say that they are of the same record type.
In Cerb, we include a set of built-in record types to help you get started. When you add a new customer they become a contact record. Their company becomes an organization record. You write to them using an email address record. A specific conversation with them is stored as a ticket record, which is a collection of message and comment records. Your team can also keep track of what needs to be done using task records.
While the built-in record types cover things that every team has in common, individual teams also need to keep track of data that's specific to them or their industry. For instance, if you're a transportation company, your tickets may refer to physical trucks, planes, and ships in the real world.
New record types can be added using Cerb's plugin system. There are already plugins for logging details about phone calls, tracking sales opportunities, saving tweets where your brand is mentioned, building Kanban-style project boards, and much more.
Previously, if you found yourself needing a completely new record type, you had to find a software developer and have them build a new plugin for it. This was potentially complicated and expensive.
We've made this much easier.
Embracing the web browser
Ever since the introduction of bots in version 5.4 (May 2011), we've been moving customization (like business rules) out of code-based plugins and into the web-based interface. This allows everyone – not just developers – to build new functionality and automate their workflow within Cerb with just a web browser.
As of the 8.2 release, you're now able to create new record types directly from your web browser without the need for plugins.
Example use case: Academia
In the rest of this guide, we'll assume that we're the support team at a university. We want to link courses, instructors, and rooms to the rest of our data in Cerb (tickets, tasks, project boards, etc).
Let's get started.
Create the instructor record type
First, we'll create a new custom record for instructors.
-
Navigate to Search » Custom Records.
-
Click the (+) icon above the worklist to create the first new record type.
- Enter the following details:
- Singular:
Instructor - Plural:
Instructors - URI:
instructor - Ownable by: (blank)
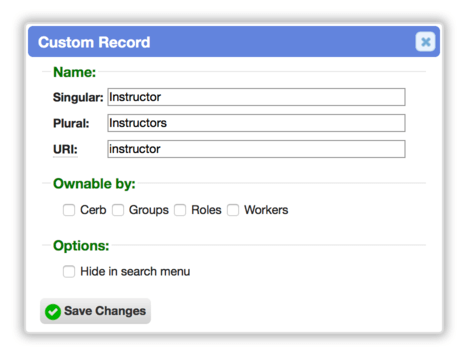
- Singular:
- Click the Save Changes button.
Create the room record type
Next, we'll create another new custom record for rooms where classes take place.
-
Click the (+) icon above the worklist.
- Enter the following details:
- Singular:
Room - Plural:
Rooms - URI:
room - Ownable by: (blank)
- Singular:
- Click the Save Changes button.
Create the course record type
With rooms and instructors available, we're now ready to create a third custom record for our available courses.
-
Click the (+) icon above the worklist.
- Enter the following details:
- Singular:
Course - Plural:
Courses - URI:
course - Ownable by: (blank)
- Singular:
- Click the Save Changes button.
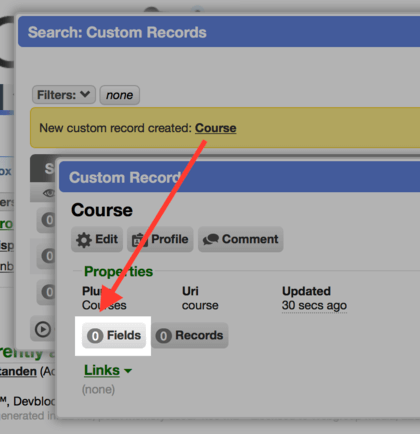
Add new fields to the course record type
We have several pieces of data we want to track for each course. Each course has an instructor and takes place in a specific room with a given schedule.
Let's add those extra fields to course records.
-
Click on Course in the yellow notification above the worklist.
-
Click on the Fields search button:
Let's add a custom field for the product's price:
-
Click on the (+) icon above the custom fields worklist to add a new field.
- Enter the following details:
- Name: Code
- Type: Text: Single Line
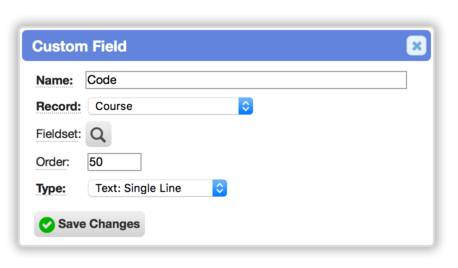
- Click the Save Changes button.
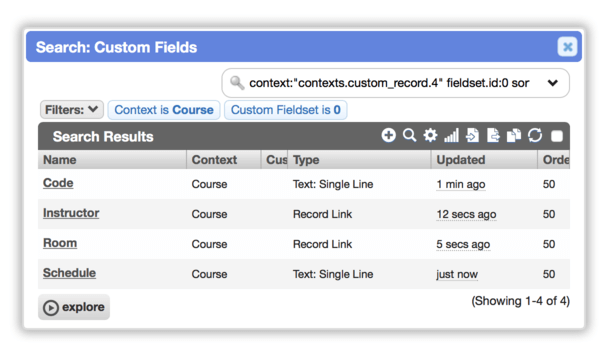
Repeat the above steps for the following fields:
| Name | Type | Options |
|---|---|---|
Instructor |
Record Link | Instructor |
Room |
Record Link | Room |
Schedule |
Text: Single Line |
You should see the following custom fields:
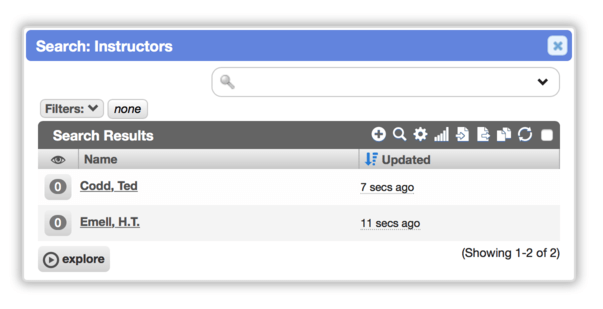
Create new instructor records
Now let's create some new records and link them together.
First, we'll create records for our esteemed instructors:
-
Click on the logo in the top left to reload the page.
-
Navigate to Search » Instructors.
-
Click the (+) icon above the instructors worklist to add new records.
-
Add the following instructors:
- Codd, Ted
- Emell, H.T.
You should see these instructor records:
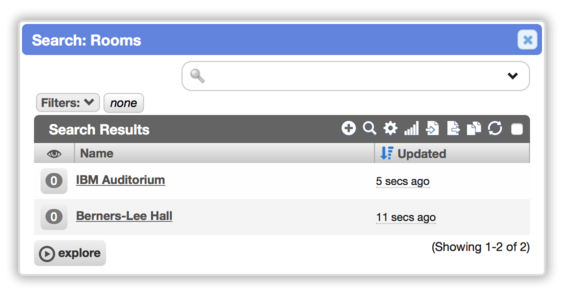
Create new room records
Let's create some rooms where courses take place:
-
Navigate to Search » Rooms.
-
Click the (+) icon above the rooms worklist to add new records.
-
Add the following rooms:
- Berners-Lee Hall
- IBM Auditorium
You should see these room records:
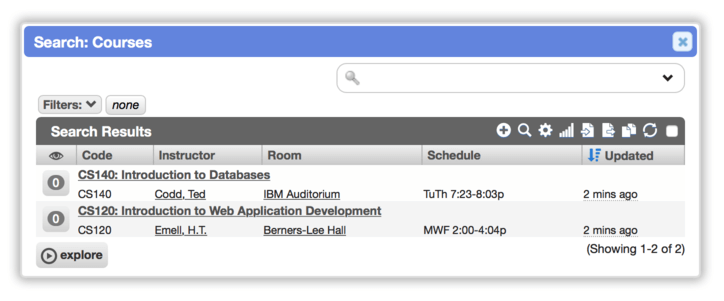
Create course records
Now we're ready to create our courses:
-
Navigate to Search » Courses.
-
Click the (+) icon above the courses worklist to add new records.
-
Add the following courses:
Name Code Instructor Room Schedule CS120: Introduction to Web Application DevelopmentCS120 Emell, H.T. Berners-Lee Hall MWF 2:00-4:04pCS140: Introduction to DatabasesCS140 Codd, Ted IBM Auditorium TuTh 7:23-8:03p
You should have the following courses:
Set the default card fields for courses
The course cards are pretty boring right now:
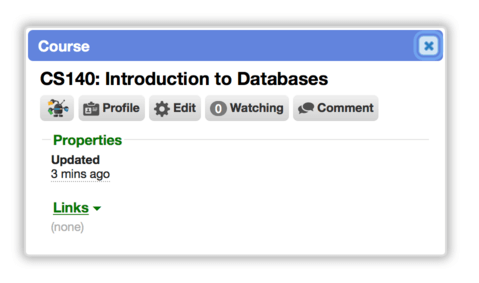
Let's add our important fields to them. These next steps assume you're an administrator.
-
Navigate to Setup » Configure » Cards.
-
Select Courses.
- Select the following fields:
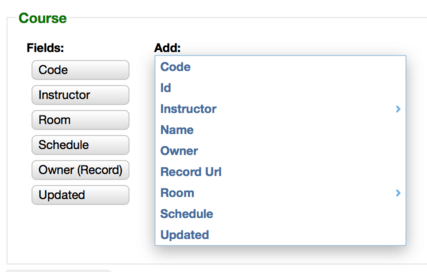
- Click the Save Changes button.
Now open one of your course cards:
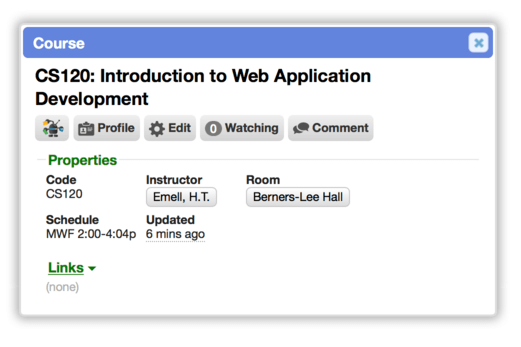
You can open the instructor and room cards directly from the course code.
Deep search course records
As you would expect, you can search course records by the new fields you created.
You can also use deep search to search courses based on the fields of instructors and/or rooms.
Navigate to Search » Courses.
Enter the following quick search:
instructor:(name:Emell) room:(name:Berners)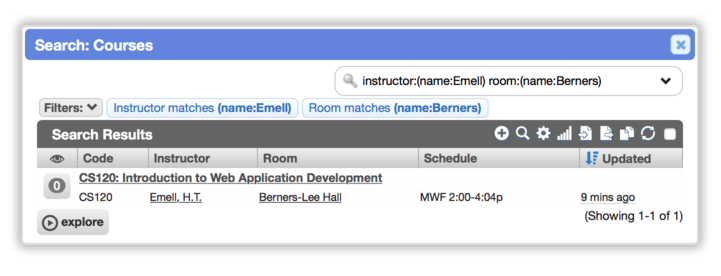
Next steps
You can now link records (like tickets and tasks) to courses, rooms, or instructors. This provides simple references for your entire team during support. You can even automate these links when tickets are created. This also allows you to filter tickets or tasks by which custom records they're linked to.
You can add cards for courses, rooms, and instructor to project boards to visually organize your workflow.
You can create bot behaviors on the Custom behavior on [course, room, instructor] to automate changes to those records. Or you can use Record changed events that trigger when special fields change on these records.
Most importantly, now you can create custom records for any of your other data you'd like to bring into Cerb.
References
-
Wikipedia: Recorded history - https://en.wikipedia.org/wiki/Recorded_history ↩