Building packages

- What are packages?
- The structure of a package
- Scripting
- Placeholders
- Package Library
- Making packages configurable
- Next steps
- References
What are packages?
Packages are a blueprint for importing a related set of pre-configured records into Cerb. A single package can contain workspaces, dashboards, bots, project boards, custom records, custom fieldsets, tasks, tickets, contacts, etc.
This allows you to quickly configure Cerb for your needs.
For instance, in our Packages Library you'll find the Customer Satisfaction Surveys package. This creates three new custom fieldsets for tracking satisfaction metrics. It creates a conversational bot that can converse with your clients to gauge their satisfaction. It adds a community portal for the bot to use. And it creates a workspace with three dashboards for reporting on your NPS, CSAT, and CES metrics.
It would probably take you several hours to follow detailed instructions for creating all of that in your own copy of Cerb. With a package, you can import the customer satisfaction workflow and start using it in seconds.
As well, rather than us locking you into a specific approach, you can now modify every aspect of the records created by the package to meet your exact needs. We can also offer alternative packages for different needs.
You can create your own packages and use them in setup, automations, or the API.
Perhaps you want to build Onboarding Bot to configure a default workspace for new workers and give them a project board checklist to get them up to speed. You can create these records as a package, and use prompts to personalize them every time they are imported.
Packages also simplify the process of importing and synchronizing records from other apps and services.
The structure of a package
Packages use the JSON1 file format. This is something you can easily create from any text editor, and read/write in nearly any programming language.
Here's the basic structure of a package:
{
  "package": {
    "name": "Package Name",
    "revision": 1,
    "requires": {
      "cerb_version": "9.2.0",
      "plugins": []
    },
    "library": {},
    "configure": {
      "placeholders": [],
      "prompts": []
    }
  },
  "records": [],
  "bots": []
}
First, let's look at the package section:
- name is the human-friendly name of the package.
- revision is incremented each time the package changes.
- requires specifies the requirements of the package (Cerb version, installed plugins).
- library is optional metadata for the package library. This is covered in more detail below.
- configure defines the
promptsandplaceholdersused to configure this package. We'll cover those more in a minute.
We also see two other keys:
- records is an optional array of record objects. A package can include any number of records.
- bots is an optional array of bot objects. While bots are also comprised of records, their potentially complex behaviors are easier to import as a single unit instead of individual records for each component.
Scripting
A package itself must always be a valid JSON object, but any key or value string can use Cerb's scripting syntax for dynamic content.
Because packages can include bots that also use scripting, packages use a slightly modified syntax to avoid conflicting with them:
- Commands use
{{% ... %}}rather than{% ... %} - Placeholders use
{{{...}}}rather than{{...}} - Comments use
{{#...#}}rather than{#...#}
Placeholders
Most importantly, scripting provides placeholders that are substituted with a new value when a package is imported.
There are several sources of placeholders:
- The default object provides access to global defaults:
{{{default.base_url}}}is the base URL where Cerb is running. e.g. https://support.cerb.example/{{{default.group_id}}}is the ID of your default group. e.g.123for "Support"{{{default.bucket_id}}}is the ID of your default group's default bucket. e.g.456for "Inbox"{{{default.replyto_id}}}is the ID of your default sender address. e.g.789for support@cerb.example{{{default.replyto_email}}}is the default sender address. e.g. support@cerb.example
- Built-in placeholders provide common functionality like generating random numbers or passwords.
- Prompts ask for input to configure the package before it's imported. These can be different every time the package is used, and they're the key to designing reusable packages.
- UIDs are unique identifiers for referencing specific records included within the package. These are automatically replaced with record IDs once imported. e.g.
{{{uid.example_uid}}}
Package Library
Pre-approved packages can be added to the package library as templates for use by workers when creating new records.
The library key uses the following structure:
{
  "package": {
    "library": {
      "name": "Package Name",
      "uri": "a_unique_package_identifier",
      "description": "A description of your package",
      "instructions": "Instructions with **Markdown** formatting.",
      "point": "an_extension_point",
      "image": "data:image/png;base64,..."
    }
  }
}- name is the human-friendly name of the package shown in the library.
- uri is a globally unique identifier for the package (lowercase letters, numbers, and underscores).
- description is a brief summary of the package's contents.
- instructions includes any additional information a worker may need to know before using the package. This can include Markdown formatting. Multiple lines are delimited with
\r\ncharacters. - point is one of the library sections described below.
- image is a Base64-encoded PNG image (480 x 270) in data URI format. This key may be omitted or blank to use the default artwork for the given
point.
Library sections
behaviorbehavior_actionbehavior_action:<event.point.id>behavior_loopbehavior_switchcalendarconnected_serviceprofile_tabprofile_tab:<record_alias>profile_widgetprofile_widget:<record_alias>project_boardtaskworkflowworkspace_pageworkspace_tabworkspace_widget
Adding packages to the library
Once your package is complete, you can add it to the library from Setup » Packages » Library.
Click (+) in the top right of the packages worklist.
Paste your package into the Package: (JSON) section and click the Save Changes button.
Making packages configurable
Built-in placeholders, prompts and options are used to customize packages every time they are imported.
Built-in placeholders
Random code generator
The random code generator is useful for generating passwords, confirmation codes, or secret keys.
For instance, the Customer Satisfaction Surveys package generates a different random 16-character secret key every time it's imported. This secret key is used by the bot to "sign" survey URLs and ensure they weren't tampered with. If the same default key was shared by everyone who installed the package, then everyone could forge new survey links for anyone else. Instead, two people importing the same package get two different secret keys.
Here's an example package that uses the random code generating to generate random tasks:
{
"package": {
"name": "Example Package",
"configure": {
"placeholders": [
{
"type": "random",
"key": "random_code",
"params": {
"length": "8"
}
}
]
}
},
"records": [
{
"uid": "task_001",
"_context": "task",
"title": "Random task #{{{random_code}}}"
}
]
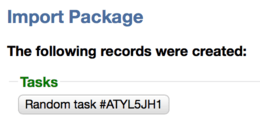
}Every time you import this package it will generate a new task record with a random 8-character code, like:
Data Query
Added in 9.6.
{
  "package": {
    "name": "Example Package",
    "configure": {
      "placeholders": [
        {
          "type": "data_query",
          "key": "ticket_profile_tab_id",
          "params": {
            "query": "type:worklist.records of:profile_tab query:(name:\"Overview\" record:\"cerberusweb.contexts.ticket\" format:dictionaries limit:1)",
            "selector": "{{results.data|first.id}}",
            "format": "json",
            "validate": "{% if results.data|first.id is empty %}Ticket profile tab record not found.{% endif %}"
          }
        }
      ]
    }
  },
  "records": [
    {
      "uid": "widget_001",
      "_context": "profile_widget",
      "name": "Example Widget",
      "profile_tab_id": "{{{ticket_profile_tab_id}}}",
      "extension_id": "cerb.profile.tab.widget.sheet"
    }
  ]
}
Prompts
Prompted placeholders ask the importer for extra information which is then incorporated into the package.
Text entry
The simplest prompted placeholder is a text box.
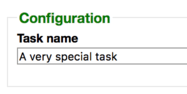
This package will prompt you for the name of a new task before creating it:
{
"package": {
"name": "Example Package",
"configure": {
"prompts": [
{
"type": "text",
"label": "Task name",
"key": "task_name",
"params": {
"default": "A very special task",
"placeholder": "(enter a task name)"
}
}
]
}
},
"records": [
{
"uid": "task_001",
"_context": "task",
"title": "{{{task_name}}}"
}
]
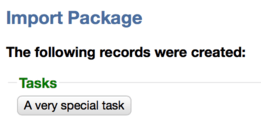
}When you import the package you'll see the following prompt:
Whatever you type will be used as the new task name:
Picklists
Your package can prompt with a picklist of pre-defined options.
This package will prompt you for the importance before creating a task:
{
"package": {
"name": "Example Package",
"requires": {
"cerb_version": "9.1.4",
"plugins": []
},
"configure": {
"prompts": [
{
"type": "picklist",
"label": "Importance",
"key": "prompt_importance",
"params": {
"options": {"Low":25,"Normal":50,"High":75,"Urgent":100},
"default": 50
}
}
]
}
},
"records": [
{
"uid": "task_001",
"_context": "task",
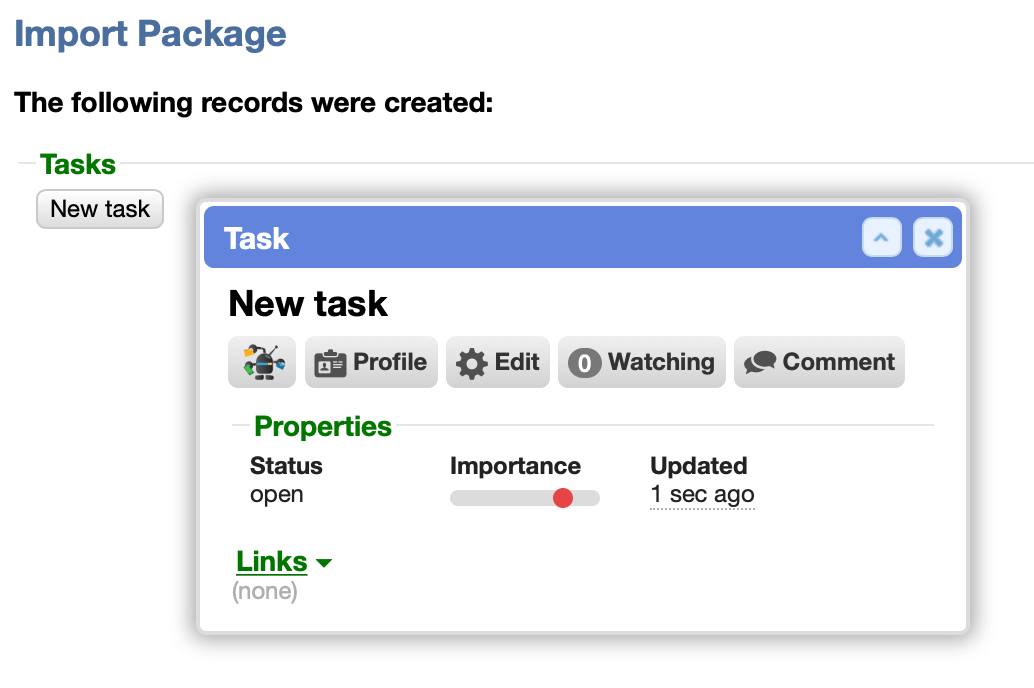
"title": "New task",
"importance": "{{{prompt_importance}}}"
}
]
}When you import the package, you'll be prompted for the importance with a dropdown:

After importing the package, the new task has the importance you assigned:
The options can be specified as a simple array:
"options": ["Option 1", "Option 2", "Option 3"]Or as an object with label/value pairs:
"options": {
  "First": "Value 1",
  "Second": "Value 2",
  "Third": "Value 3",
  "Fourth": "Value 4",
  "Fifth": "Value 5"
}
Choosers
Your package may also need to reference records that already exist in Cerb. For instance, your new Onboarding Bot may need to target a specific worker to set up their environment.
To accomplish this, you can include a chooser prompt.
This package prompts for a worker and assigns them a task:
{
  "package": {
    "name": "Example Package",
    "requires": {
      "cerb_version": "9.1.4",
      "plugins": []
    },
    "configure": {
      "prompts": [
        {
          "type": "chooser",
          "label": "Who should the new task be assigned to?",
          "key": "task_owner_id",
          "params": {
            "context": "cerberusweb.contexts.worker",
            "single": true,
            "query": "isDisabled:n"
          }
        }
      ]
    }
  },
  "records": [
    {
      "uid": "task_001",
      "_context": "task",
      "title": "New task for {{{task_owner__label}}}",
      "owner_id": "{{{task_owner_id}}}"
    }
  ]
}
When you import the package, you'll be prompted to pick a task assignee with a chooser:

After importing the package, the new task is automatically assigned to the worker you selected:
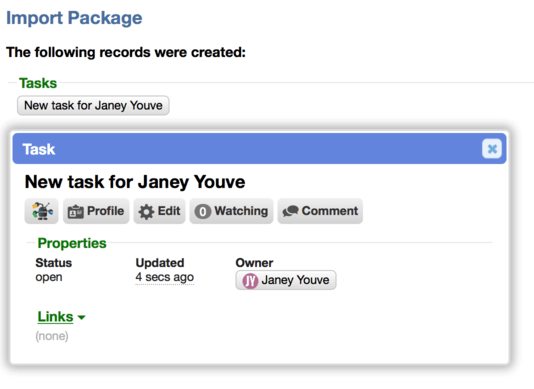
If the key of your chooser prompt ends with _id then Cerb will automatically load in all of the records placeholders. That's why we can use the {{{task_owner__label}}} placeholder in the example above, for our prompt named {{{task_owner_id}}}. This requires Cerb 8.3.4 or later.
Options
disable_events
The disable_events option prevents bot behaviors or automations from triggering on new records.
        "configure": {
            "prompts": [],
            "placeholders": [],
            "options": {
                "disable_events": true
            }
        }
This can be useful, for example, when importing historical records from another system where you don't want workflows for autoresponders or customer surveys to trigger.
Next steps
Now that you understand how to create a basic package, learn more about adding records to packages and importing packages.
References
-
Wikipedia: JSON - https://en.wikipedia.org/wiki/JSON ↩