Automations
Automations are self-contained state machines written in KATA that transform an input dictionary into an output dictionary. The results are used to automate and customize workflows throughout Cerb.
Syntax
This simple automation, written in KATA:
start:
  return:
    answer: {{a * b}}
With this input:
a: 5
b: 4
Returns this output:
answer: 20Dictionaries
A dictionary is simply a set of keys with corresponding values. Keys are a name that ends with a colon (:). Values are units of data like text, numbers, arrays (lists), booleans (true/false), or dictionaries.
The input and output above are dictionaries.
The input dictionary has a key a: with the value 5, and a key b: with the value 4.
The output dictionary has a key answer: with the value 20.
In KATA, indenting keys with spaces creates a hierarchy of parent/child relationships. start: has a child return: which has a child answer:.
There is a unique key path to any key. In the example above, start:return:answer: is the path to the key containing the answer. These paths are used by visualizations and error messages to refer to a specific point in a KATA document.
The purpose of an automation is to transform an input dictionary into an output dictionary. Depending on where an automation is used, there are different expected inputs and outputs.
When an automation executes, it creates a new working memory dictionary that starts as a copy of its input. Within this dictionary an automation can store, retrieve, and manipulate data using keys.
Dialects
There are various dialects of KATA: automations, maps, toolbars, events, etc. The dialects share the same overall syntax, but each has a different vocabulary of keys.
In automations, keys describe a declarative set of commands. In other words, an automation serves as a natural language outline of logic and actions to be undertaken, rather than a set of detailed computer programming instructions for carrying out each step.
For instance, the command http.request: fetches a web page by URL and save its status code, headers, and body to a given key in the dictionary.
Names
When the same command appears multiple times within the same parent, each instance must have a unique name. Commands are named by appending a forward slash (/) and an identifier.
The identifier may contain letters, numbers, and underscores.
For instance, we could "hardcode" the inputs from the first example above as keys:
start:
  set/a:
    a: 5
  set/b:
    b: 4
  return:
    answer: {{a * b}}
We use the set: command twice in the start: parent, so we name them set/a: and set/b:.
Key names are part of a key's path (e.g. start:set/b:).
Scripting
Values can be dynamically generated from the output of scripting.
In the previous examples we had this line:
answer: {{a * b}}This computes a new value by multiplying the value in placeholder a by the value in placeholder b.
Scripting occurs within specific tags:
| Tag | |
|---|---|
{{ }} |
Output a placeholder or expression |
{% %} |
Execute a control flow statement (looping, branching) |
{# #} |
Include a hidden code comment |
In scripts, you can refer to any key from the working memory dictionary, which are often referred to as placeholders to avoid ambiguity with keys in KATA documents.
Scripting provides several functions and filters for quickly formatting and manipulating data.
Refer to the scripting documentation for a full list of capabilities.
Annotations
In KATA, all values that immediately follow a key are assumed to be text by default:
a: 5
b: 4
In the example above, 5 and 4 are treated as text rather than numbers. However, in certain situations, like mathematical operations, a text value can be automatically coerced into a number.
KATA stands for Key Annotated Tree of Attributes. Annotations are tags on keys with special instructions for handling their value.
Annotations start with @ and are appended to a key name.
For example, we can explicitly specify that a key's value is an integer (a non-fractional number) with @int:
start:
  set:
    a@int: 5
    b@int: 4
  return:
    answer@int: {{a * b}}
In the above automation's dictionary, the value for the keys a:, b:, and answer: are now strictly numeric.
Annotations are not part of a key's name or path. The key path start:set/a:a: points to the value 5.
Here are some common annotations:
| Annotation | |
|---|---|
@base64: |
Binary data encoded as Base64 text |
@bit: |
0 (off, false, no, n) or 1 (any non-false value) |
@bool: |
false (no, n, off, 0) or true (any non-false value) |
@csv: |
An array encoded as comma-separated text |
@date: |
A human-readable absolute (Jan 1 2025 08:00) or relative (+2 hours) date |
@float: |
A floating point number |
@int: |
A non-fractional number |
@json: |
A dictionary encoded as JSON text |
@kata: |
A dictionary encoded as KATA text |
@key: |
A copy of the value from the given key path |
@list: |
An array encoded as a line-delimited text block |
@optional: |
Remove the key if the value is empty |
@text: |
A multiple line text block |
@trim: |
Remove the value's leading and trailing whitespace |
Multiple annotations may be joined with commas. They are evaluated from left to right.
For instance:
start:
  set:
    a: 5
    b@key,int: a
  return:
    answer@int: {{a * b}}
The line b@key,int: a is setting the key b: to the value of the a key, and then converting it to an integer.
Multiple line values
An annotated key may be followed by an indented block of text to set a multiple-line value:
start:
  set:
    countries@json:
      {
        "United States": {
          "pop": 330052960,
          "pop_est": 2020
        },
        "China": {
          "pop": 1441615562,
          "pop_est": 2020
        }
      }
  return:
    output@text:
      {% set diff = countries.China.pop - countries['United States'].pop %}
      There are {{diff|number_format}} more people in China than the USA.
There are 1,111,562,602 more people in China than the USA.This approach is particularly useful when you need to create a dictionary with keys that contain characters like spaces, which are not valid in KATA keys.
Commands
State transitions
| await: | Pauses the automation in the await state with output. Creates a continuation for resuming. |
| error: | Unsuccessfully terminates the automation in the error state with output. |
| return: | Successfully terminates the automation in the return state with output. |
Flow control
| decision: | Conditionally select one of multiple potential outcomes. |
| outcome: | A conditional sequence of commands. |
| repeat: | Iterate an array and repeat a sequence of commands for each value. |
| while: | Conditionally loop a sequence of commands. |
Logging
| log: | Log a debug message. |
| log.warn: | Log a warning message. |
| log.error: | Log an error message. |
| log.alert: | Log an alert message. |
Actions
| api.command: | Execute an API command and return the response. |
| data.query: | Execute a data query and return the response. |
| decrypt.pgp: | Decrypt a PGP encrypted message. |
| email.parse: | Parse a MIME-encoded email message into a ticket. |
| encrypt.pgp: | Encrypt a message for one or more PGP public keys. |
| file.read: | Read chunks of bytes from an attachment or automation resource. |
| file.write: | Write bytes to an automation resource. |
| function: | Execute an automation.function automation and return output. |
| http.request: | Send data to an HTTP endpoint and return the response. |
| kata.parse: | Parse an arbitrary KATA document with placeholders. |
| llm.agent: | Send a message to a conversational AI agent using a large language model with tools and transcripts. |
| llm.chat: | Send a message to a conversational large language model. |
| llm.embed: | Generate text vector embeddings using a large language model. |
| metric.increment: | Add new samples to a metric. |
| queue.pop: | Pop an item from a queue. |
| queue.push: | Push an item into a queue. |
| record.create: | Create a record. |
| record.delete: | Delete a record. |
| record.get: | Retrieve a record. |
| record.search: | Search records. |
| record.update: | Update a record. |
| record.upsert: | Create or update a record. |
| set: | Set one or more placeholders. |
| storage.get: | Retrieve arbitrary data from long-term storage. |
| storage.set: | Save arbitrary data to long-term storage. |
| storage.delete: | Delete data from long-term storage. |
| var.expand: | Expand paths on keys. |
| var.push: | Add an element to a list placeholder. |
| var.set: | Set a placeholder using a complex key path. |
| var.unset: | Unset a placeholder. |
Simulation
| simulate.success: | Simulate command output and execute the on_success: event. |
| simulate.error: | Simulate command output and execute the on_error: event. |
Execution
An automation can store, retrieve, and manipulate data using keys in the working memory dictionary.
During execution, the dictionary also keeps track of an automation's control flow (conditional branches, call stack, loops, past inputs, etc).
An automation begins execution at the start: command.
Inputs
Automations that support custom input may optionally provide an inputs: key to define the possible values that a caller can provide.
Inputs are defined with a type/name: key. The name must be unique within the inputs.
The type must be one of:
| array: | An array of values |
| record: | A record ID of a given type (converted to a dictionary) |
| records: | Multiple record IDs of a given type (converted to an array of dictionaries) |
| text: | Text with an optional data type |
The values are available in the inputs placeholder.
inputs:
  record/ticket:
    record_type: ticket
    required@bool: yes
  text/subject:
    required@bool: yes

start:
  return:
    result@text:
      Changed the subject on ticket {{inputs.ticket.mask}} to: {{inputs.subject}}
Snippet examples
Automations that support custom inputs: can provide a snippet: key for each input.
This is used when inserting the automation into an editor from an interaction.
inputs:
  text/subject:
    type: freeform
    required@bool: yes
    snippet:
      subject: This is an example subject
Exit states
After execution, an automation concludes in one of the following __exit states:
| State | |
|---|---|
return |
The automation completed successfully and provided output in the __return: key |
await |
The automation paused awaiting additional input described by __return: |
error |
The automation failed with an error in __return:error: |
exit |
The automation exited without success or failure (default) |
Error handling
Each command in the automation can result in success or failure.
Commands may provide on_success: and on_error: events to run any number of commands in response to success or failure.
The on_error: event can recover from an error to continue execution.
If the on_error: event is omitted, a command error immediately exits the automation in the error state.
This http.request command requests an invalid URL:
start:
  http.request:
    output: http_response
    inputs:
      method: GET
      url: https://invalid.url.example/
  return:
There is no on_error: event, so the automation immediately exits in the error state. The return: command is never reached.
We can add events to handle errors:
start:
  http.request:
    output: http_response
    inputs:
      method: GET
      url: https://invalid.url.example/
    on_success:
      # Commands to perform on success
      return:
    on_error:
      # Handle the error or provide a default
      return:
The automation now always exits in the return state.
Simulation
During testing and development, it may not be desirable to execute certain actions. An automation's execution can be simulated instead.
Each command can provide an on_simulate: event that is used during simulation instead of executing. This can run any number of alternative commands.
These two special commands are available during simulation:
| simulate.success: | Simulate command output and execute the on_success: event. |
| simulate.error: | Simulate command output and execute the on_error: event. |
The following example simulates an http.request: command and provides mock output:
start:
  http.request:
    output: http_response
    inputs:
      method: GET
      url: https://invalid.url.example/
    on_simulate:
      simulate.success:
        status_code: 200
        content_type: application/json
        body: { "output": "Good job!" }
    on_success:
      return:
        body@key: http_response:body
Even though the URL is invalid, the simulated output is:
body: { "output": "Good job!" }Policies
The permissions of automations are governed by policies. A policy is a collection of rules which describe the conditions where each action would be permitted or denied.
Scopes
| Scope | |
|---|---|
callers: |
Rules that determine who can use an interaction, and where |
commands: |
Rules that determine what commands are allowed or denied |
Placeholders
Policies can use placeholders based on the command:
| Key | Example | |
|---|---|---|
node.id |
The key path of the command | start:record.create: |
node.type |
The name of the command | record.create |
inputs.* |
The dictionary of inputs | inputs.record_type |
output |
The output placeholder name | result |
Rules
Callers
Some automation triggers support callers. A caller contains information about where, and by whom, an automation was started. These details can be used in policy rules.
| Trigger |
|---|
| interaction.worker |
The following policy allows an interaction on project board columns when a worker has write-access on the board, and otherwise denies it:
callers:
  cerb.toolbar.projectBoardColumn:
    allow/owners@bool:
      {{
        cerb_record_writeable('project_board', board_id, worker__context, worker_id)
        ? 'yes'
      }}
    deny: yes
When a caller policy denies an interaction it is automatically hidden from toolbars.
Allowed commands
This policy allows all commands:
commands:
  all:
    allow: yes
The above policy is simple but not secure. Instead, we recommend adhering to the "principle of least privilege"1. This means only allowing the minimal set of commands required to accomplish an automation's purpose.
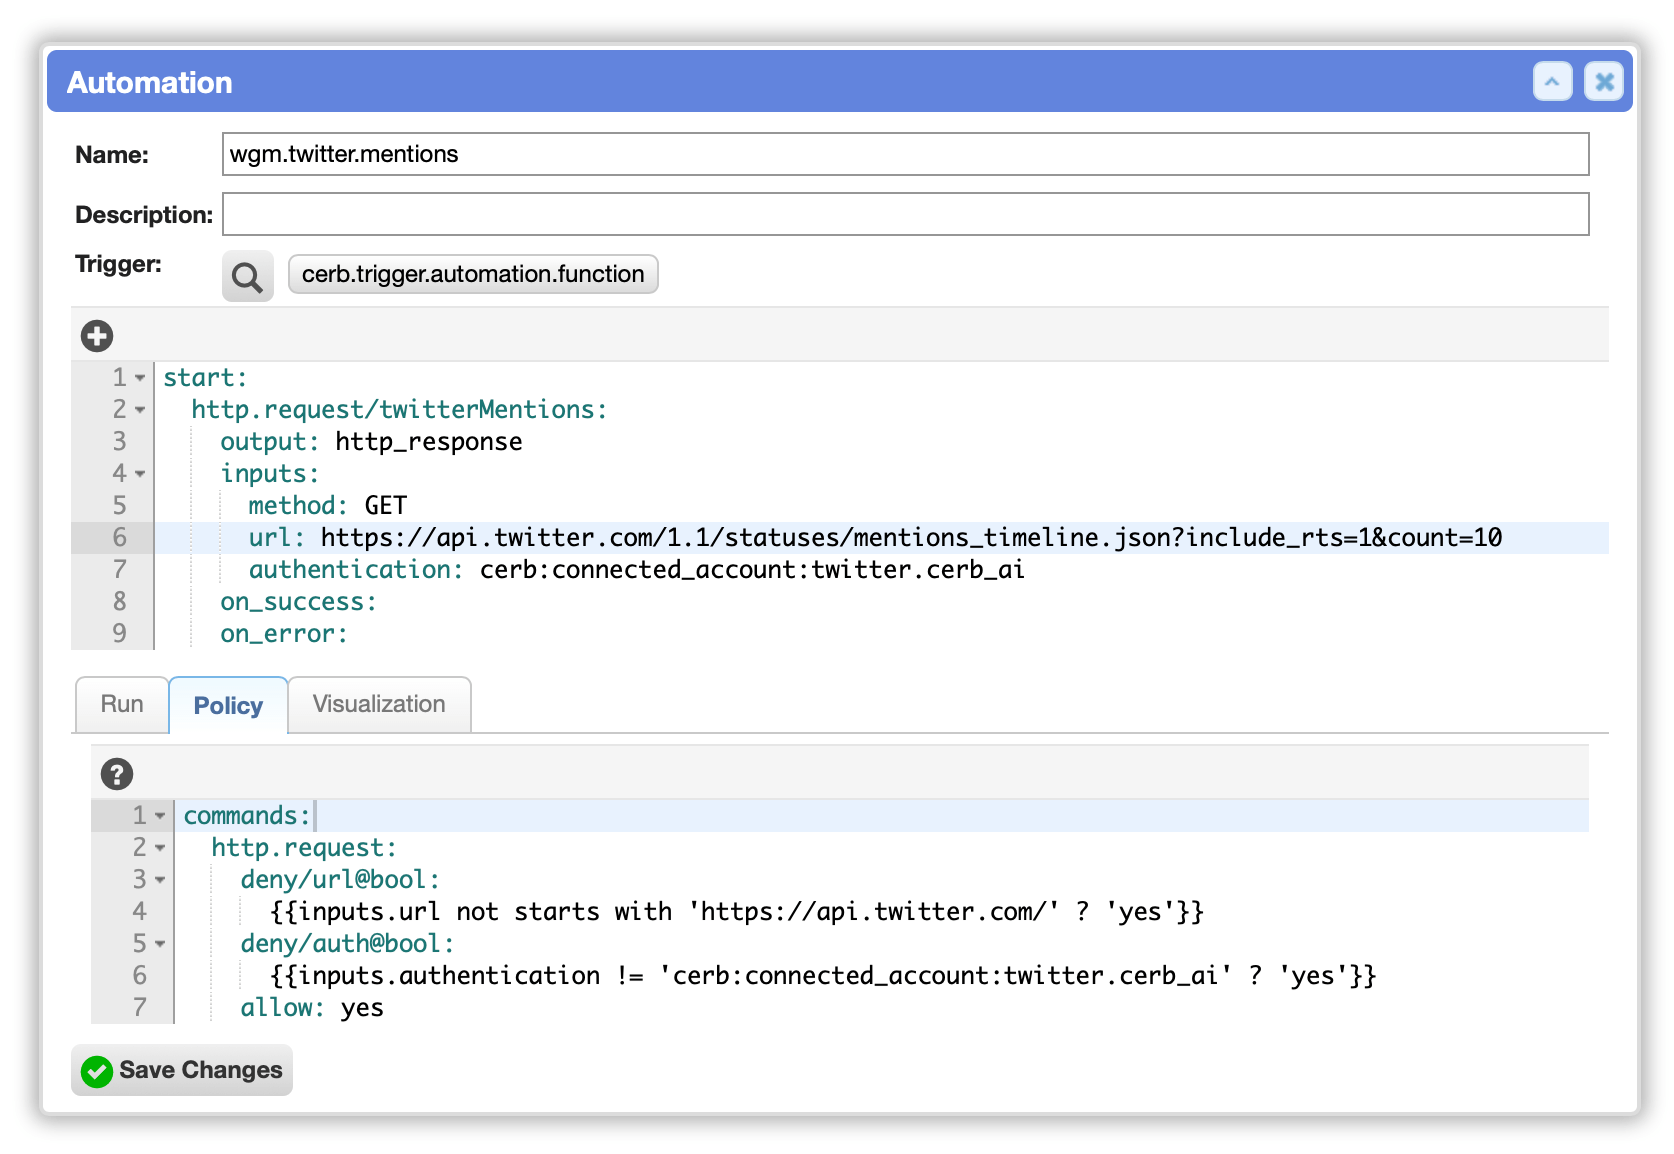
The following policy only allows:
- HTTP GET requests only to the
https://api.example/endpoint. - The creation of new task records.
- The reading of all records.
commands:
  http.request:
    allow/ourApi@bool:
      {{inputs.url starts with 'https://api.example/'
         and inputs.method == 'GET' ? 'yes'}}

  record.create:
    allow/newTasks@bool:
      {{inputs.record_type|context_alias == 'task' ? 'yes'}}

  record.get:
    allow: yes

  all:
    deny: yes
Each command can have multiple allow: and deny: rules, but they must have a unique /name suffix.
A rule with a no value is ignored (i.e. a failed "allow" does not mean "deny"). Rules are tested in sequence until an explicit allow: yes or deny: yes outcome is reached.
If a command matches no rules, the default outcome is deny: yes.
The all: key matches all commands. This can be used as a final "catch-all" to allow or deny any command that matches no other rules.
It is also possible to be permissive by default with exceptions. This following policy permits all HTTP requests except connections to unencrypted http:// endpoints:
commands:
  http.request:
    deny/http@bool:
      {{inputs.url starts with 'http://' ? 'yes'}}
    allow: yes
Time limit
By default, automations are restricted to a maximum run duration of 25,000 milliseconds (25 seconds).
This can be changed in the policy:
settings:
 time_limit_ms: 30000
In most cases, a better approach is to break up long tasks into smaller pieces and use automation timers and queues.
Testing policy rules
You can test policies from the automation simulator.
You can also test rule logic from Setup » Developers » Bot Scripting Tester:
{% set inputs = {
  url: 'https://api.example/some/path',
  method: 'GET'
} %}
{{inputs.url starts with 'https://api.example/'
    and inputs.method == 'GET' ? 'yes'}}
The test object above returns yes.
We can change the inputs to exceed the granted permissions:
{% set inputs = {
  url: 'https://danger.example/',
  method: 'POST'
} %}
{{inputs.url starts with 'https://api.example/'
    and inputs.method == 'GET' ? 'yes'}}
The above test object now returns blank, which is interpreted as no and ignored. The policy returns the default deny: yes.
Events
Events are broadcast by Cerb when something happens — a message is received, a record changes, a worker logs in. Unlike triggers, events are not aimed at a specific automation. Instead, they use event listeners to associate one or more automations with an event.
| Event | |
|---|---|
| mail.draft | Modify a new or resumed draft before the editor is opened |
| mail.draft.validate | Validate an email draft before sending |
| mail.filter | Modify or reject an inbound message based on its properties |
| mail.moved | After a ticket is moved to a new group/bucket |
| mail.received | After a new email message is received |
| mail.reply.validate | Validate before a worker starts a new reply |
| mail.route | Determine a destination group inbox given properties of an incoming message |
| mail.send | Before a sent message is delivered |
| mail.sent | After a sent message is delivered |
| record.changed | React to changes in record field values |
| record.merge | Allow or deny record merge requests |
| record.merged | After a set of records was merged |
| record.viewed | After a record profile is viewed by a worker |
| reminder.remind | Send notifications about a reminder |
| worker.authenticate.failed | After a worker failed to log in (e.g. invalid password) |
| worker.authenticated | After a worker logged in successfully |
Event Listeners
An event listener is a record that binds an automation to a specific event. Listeners are managed at Search » Automation Event Listeners.
Each listener has an event_kata field that defines the binding using KATA:
automation/autoreply:
  uri: cerb:automation:example.mail.received.autoreply
  disabled@bool:
    {{not is_new_ticket}}
Each automation/name: entry specifies:
| Key | Notes |
|---|---|
uri: |
The automation to run (e.g. cerb:automation:example.name) |
disabled@bool: |
An optional condition — when true, this listener is skipped |
inputs: |
Optional key/value pairs passed to the automation's inputs: |
Multiple automations can be bound within a single listener's event_kata:
automation/onlyTasks:
  uri: cerb:automation:example.cards.task
  disabled@bool:
    {{card_type != 'task' ? 'yes'}}

automation/everythingElse:
  uri: cerb:automation:example.cards.generic
There can be multiple disabled: rules per entry. The first rule to return true is used, enabling allow-deny or deny-allow strategies. By default, all listeners are enabled.
For events that expect a single handler (e.g. mail.route), the first matching (non-disabled) automation — ordered by priority — is executed and its result returned.
For events that run all handlers (e.g. mail.received), all non-disabled automations are executed in priority order and their results collected.
Global automation events (those without a parent record, such as mail filtering) can be configured from Search » Automation Events.
Priority
Each event listener has a numeric priority from 0 to 255. Lower numbers run first. When two listeners share the same priority, they run in the order they were created.
When both automations and legacy bot behaviors are active on the same event, priority also determines their relative ordering:
| Priority | Execution order |
|---|---|
| 0–127 | Automation runs before legacy behaviors |
| 128–255 | Automation runs after legacy behaviors |
This ordering was introduced in 11.1.8. Prior to that version, automations always ran before legacy behaviors regardless of priority.
Triggers
Triggers are invoked directly by Cerb functionality — widgets, AI agents, timers, and function: calls from other automations. A trigger invokes a specific automation by name and passes structured inputs. Triggers do not use listeners.
| Trigger | Inputs | Await | |
|---|---|---|---|
| automation.function | x | A reusable function with shared functionality called by other automations | |
| automation.timer | x | * | A scheduled automation with continuations |
| behavior.action | x | Execute an automation from a legacy bot behavior | |
| data.query | x | Return results for custom data queries | |
| interaction.worker | x | * | Worker interactions on toolbars and widgets |
| interaction.worker.explore | x | * | Worker interactions that use custom logic to return the next record in explore mode |
| interaction.website | x | * | Website visitor interactions |
| llm.tool | x | A reusable function that can be invoked by a large language model | |
| map.clicked | x | Handlers for clicks on map regions and points | |
| projectBoard.cardAction | x | Actions that take place for new cards in a project board column | |
| projectBoard.renderCard | x | Dynamic card layouts on project boards | |
| reminder.remind | x | Actions that run for reminder alerts | |
| resource.get | x | Dynamic resource content | |
| scripting.function | x | Run an automation from the cerb_automation() function in scripting | |
| ui.chart.data | x | Data sources for Chart KATA widgets | |
| ui.sheet.data | x | Data sources for sheets | |
| ui.widget | x | Custom output for card, profile, or workspace widgets | |
| webhook.respond | x | Handlers for webhook listeners |
Continuations
When an automation exits in the await: state, a snapshot of its current dictionary is saved and assigned a long random identifier. This snapshot is called a continuation.
The continuation identifier is used to resume the automation from the same point at a future time with additional input.
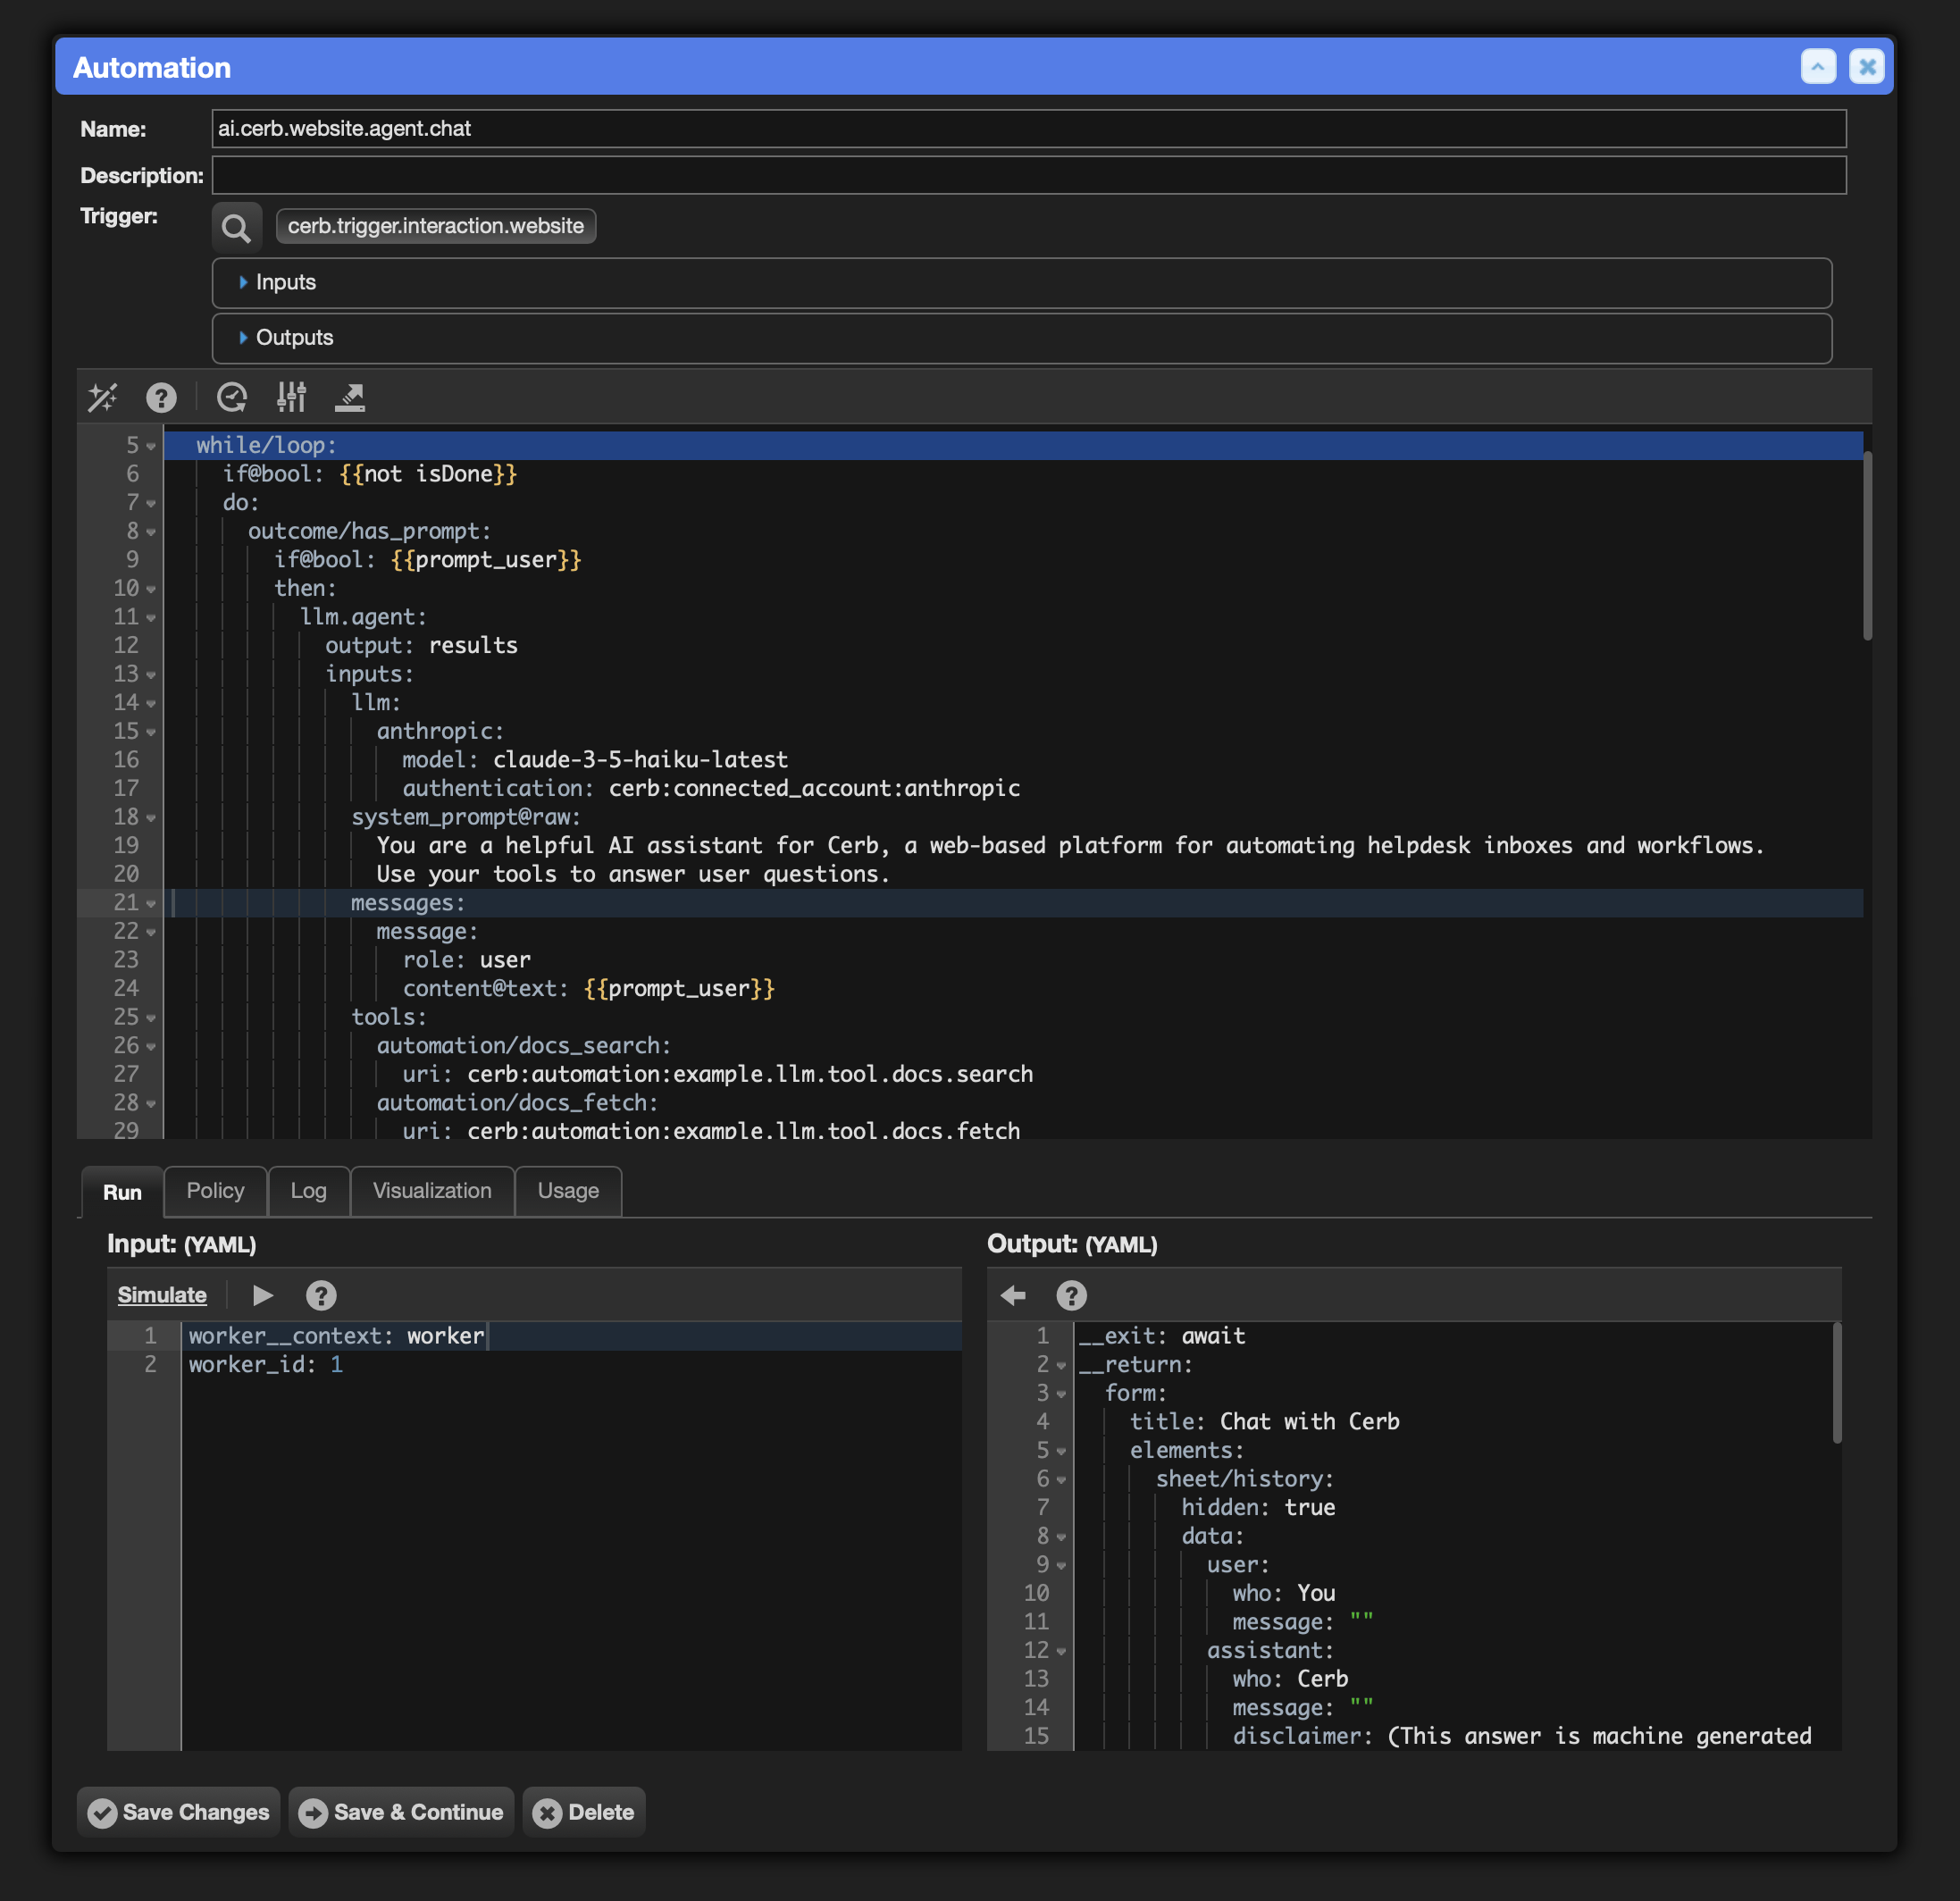
For instance, here's a basic interaction automation that pauses for user input:
start:
  await:
    form:
      elements:
        text/prompt_name:
          label: What is your name?
          required@bool: yes
  return:
    output@text:
      Hello, {{prompt_name}}!
At the await: command, the automation will send a web form to the user, create a continuation, and wait for any length of time to resume execution.
An automation that supports continuations can exit in the await: state any number of times before concluding.
start:
  await/intro:
    form:
      elements:
        text/prompt_name:
          label: Name:
          required@bool: yes
        text/prompt_email:
          label: Email:
          required@bool: yes
          type: email
          placeholder: you@example.com

  # Confirmation code is generated, saved, and emailed

  await/confirm:
    form:
      elements:
        say/hello:
          content@text:
            Hello, {{prompt_name}}!

            We just sent a confirmation code to {{prompt_email}}
        text/prompt_code:
          label: Confirmation Code:
          required@bool: yes
          type: uri
          max_length: 8

  # Confirmation code is verified

  return:
    output@text:
      Thanks, {{prompt_name}}!
      Your email address ({{prompt_email}}) been subscribed to our newsletter.
Timers
Automations can use timers to run at a future time either once or on a recurring schedule.
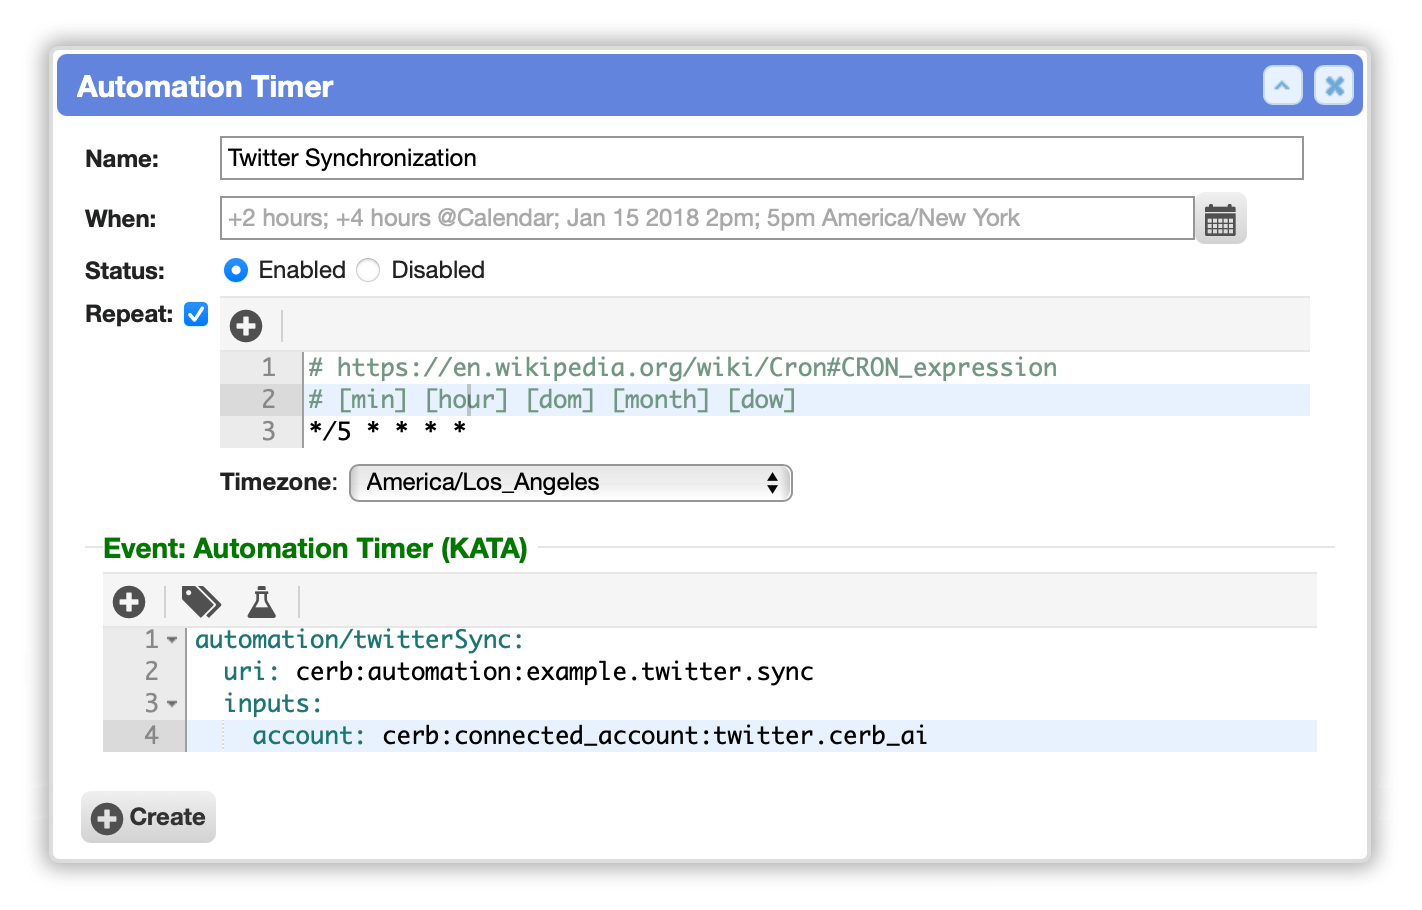
Timers can be created procedurally by automations and interactions, or manually by workers.
A timer specifies a name, a future datetime, an optional schedule, and a block of events KATA to conditionally determine an automation.timer to run.
On the first invocation of the timer, an automation is selected. This may optionally provide inputs.
When the automation concludes:
-
If the timer has a recurring schedule, it is rescheduled for the next occurrence.
-
Otherwise, a one-shot timer is disabled (or optionally deleted) at the conclusion.
If the automation ends in the await state, a continuation is created, and the timer is rescheduled for the given datetime.
The timer stores the continuation ID and the automation pauses at the current point. On the next timer invocation, the automation resumes where it left off rather than starting over.
Schedules are defined in Unix CRON expression format. When multiple expressions are specified, the timer is scheduled for the next most recent occurrence among them.
Editor
The automation editor includes syntax highlighting, autocompletion for the KATA syntax, a step-based debugger with full access to the current state, a simulator, and a reference for each trigger event.
A contextual toolbar provides interactions for adding inputs, commands, and exit states.
Change History
When editing an automation you can review past versions by clicking on the Change History button in the editor toolbar.
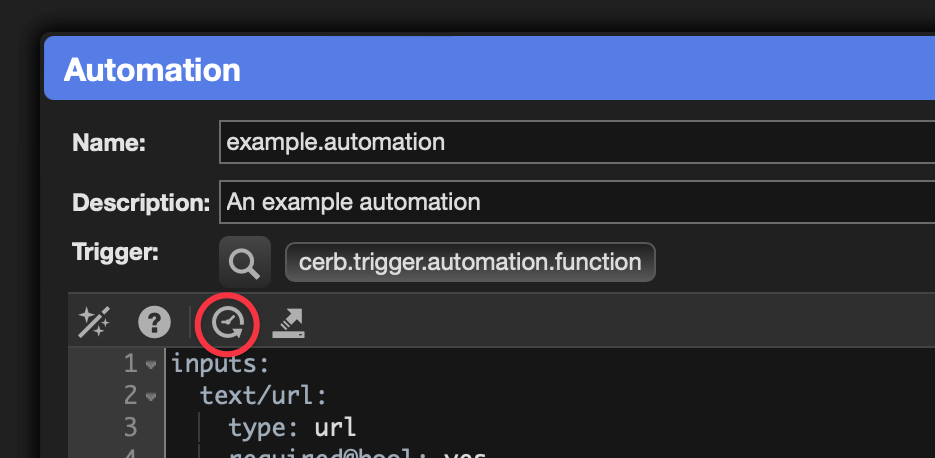
This opens a popup that displays the differences between a past version and the current version.
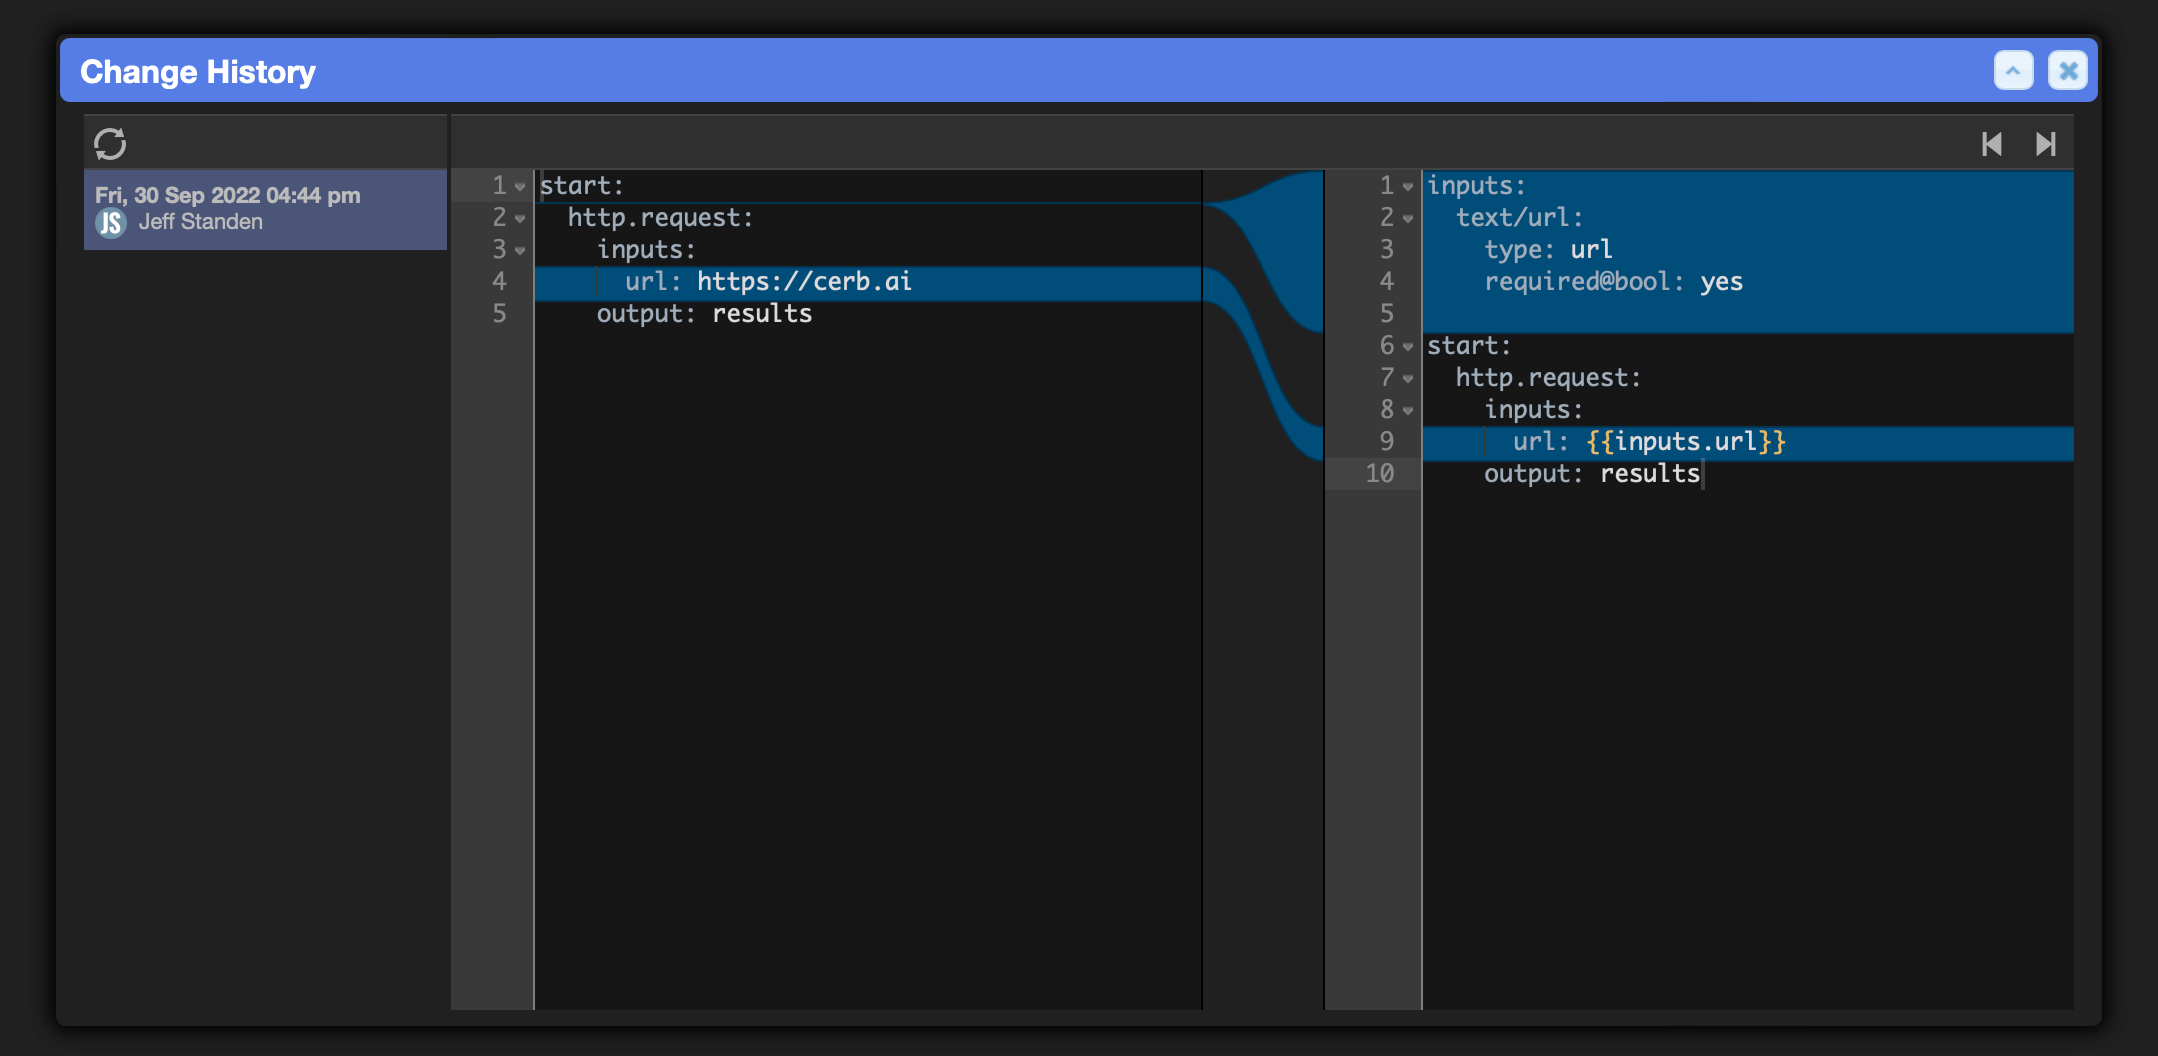
The left editor is read-only, but the right editor may be modified. Any changes will update the differences in real-time.
Export
An automation may be exported by clicking on the Export button in the editor toolbar.
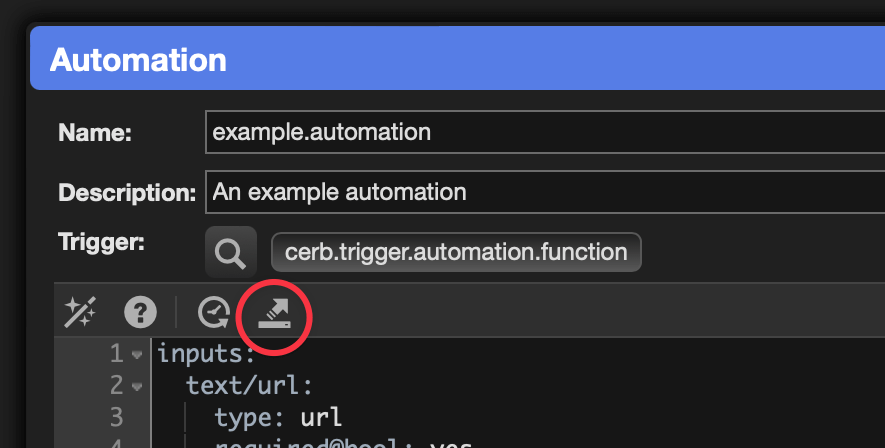
This creates a package that can be imported into another Cerb environment.
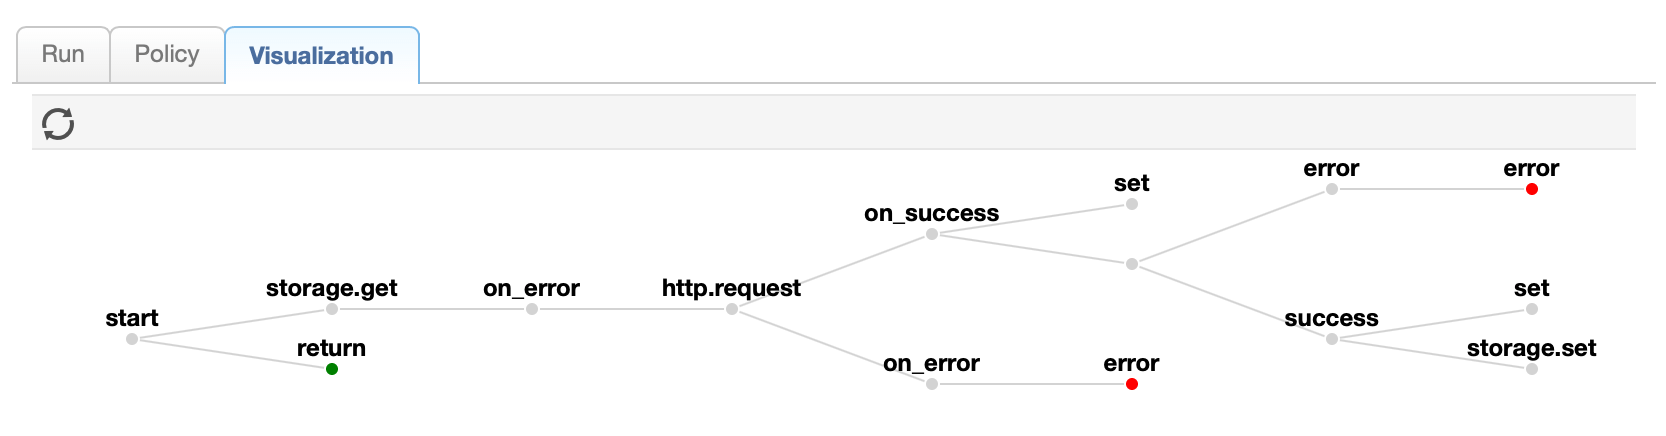
Visualizations
The automation editor has a 'Visualization' tab with a flowchart for the current script.
Clicking on a node highlights the relevant line of code in the editor.
References
-
Wikipedia: Principle of Least Privilege - https://en.wikipedia.org/wiki/Principle_of_least_privilege ↩